---
title: 'WarpEngine Toolbox'
url: 'https://wiki.teletypegames.org/development/warpengine-toolbox'
markdown: 'https://wiki.teletypegames.org/development/warpengine-toolbox.md'
lang: en
date: '2026-11-17'
description: 'WarpEngine Toolbox is a VS Code extension that takes a game from an empty folder to a released, playable entry in a WarpEngine catalog — and keeps it there — without leaving the editor. It knows no platform of its own: everything a platform needs (what it publishes, where its metadata and version l…'
taxonomy:
tag:
- howto
- engine
- warp-engine
- tooling
- typescript
- vscode
---
# WarpEngine Toolbox
**WarpEngine Toolbox** is a VS Code extension that takes a game from an empty folder to a released, playable entry in a [WarpEngine](https://wiki.teletypegames.org/engines/warp-engine) catalog — and keeps it there — without leaving the editor. It knows no platform of its own: everything a platform needs (what it publishes, where its metadata and version live, how it plays on the web, its builder image and project template) comes from the host, so a platform the host adds works in the editor the same day.
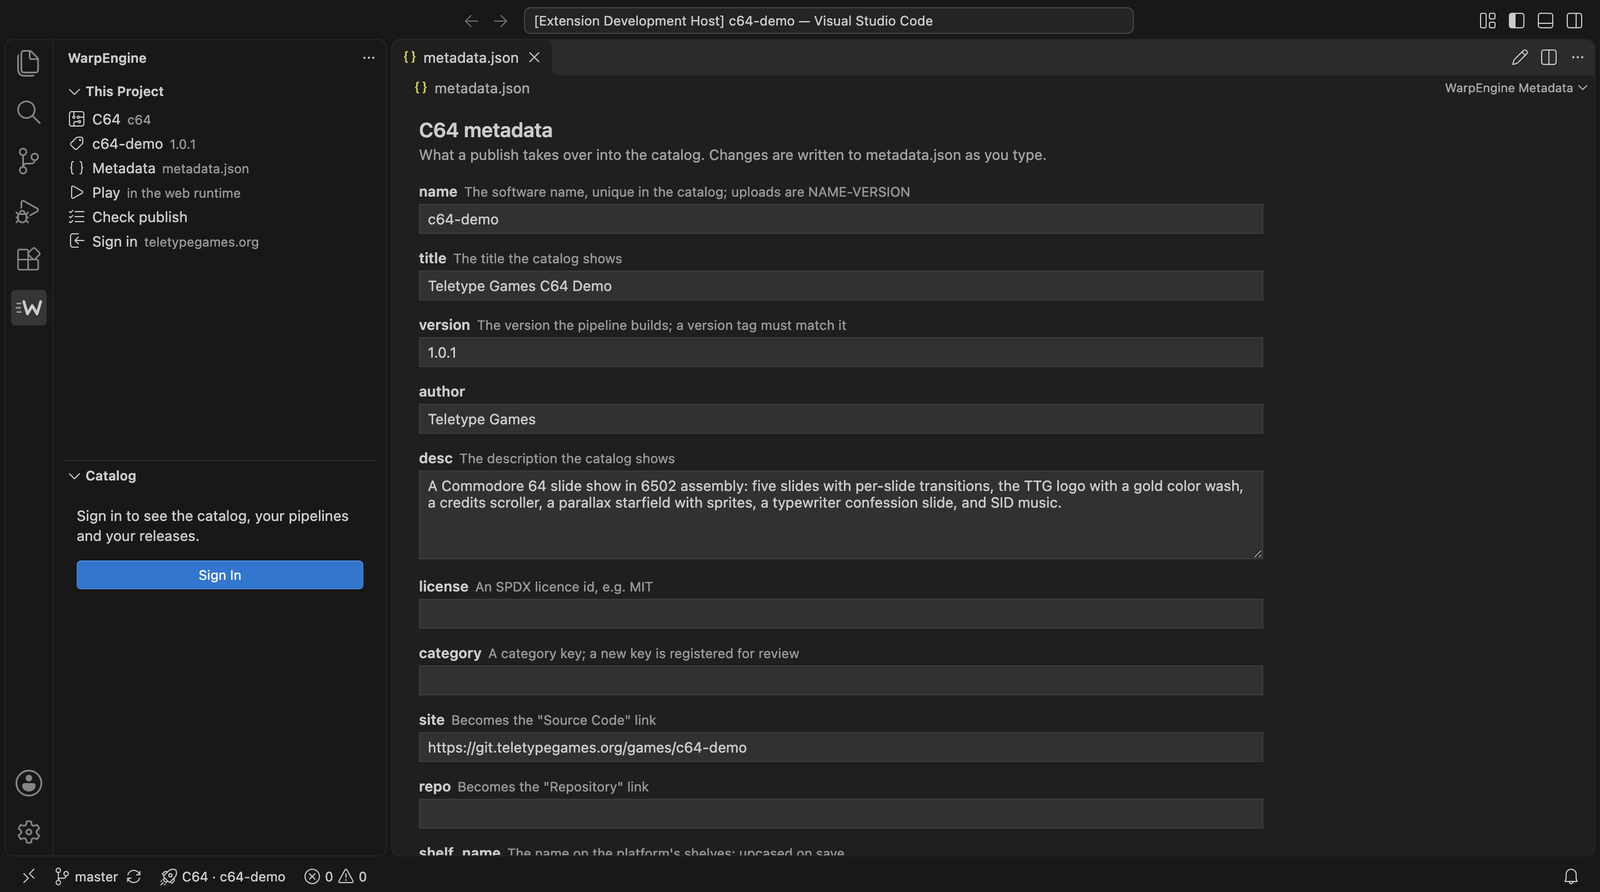
*Screenshot: the [C64 demo](https://git.teletypegames.org/games/c64-demo) opened in VS Code with the toolbox, before signing in. The form is built from the schema teletypegames.org serves for the C64.*
# Install in three steps
## 1. Install it from the Marketplace
The toolbox is on the [Visual Studio Marketplace](https://marketplace.visualstudio.com/items?itemName=TeletypeGames.warpengine-toolbox). In VS Code open **Extensions** (`⇧⌘X` / `Ctrl+Shift+X`), search for **WarpEngine Toolbox** and click **Install** — or on the command line:
```sh
code --install-extension TeletypeGames.warpengine-toolbox
```
VS Code keeps it up to date from then on.
## 2. Or from a VSIX
Every version's `.vsix` is also attached to the [releases page](https://git.teletypegames.org/tools/warp-engine-toolbox/releases): **Extensions** ▸ **⋯** ▸ **Install from VSIX…**, or `code --install-extension warpengine-toolbox-1.0.0.vsix`. To run the latest source instead:
```sh
git clone ssh://git@git.teletypegames.org:2222/tools/warp-engine-toolbox.git
cd warp-engine-toolbox
make localinstall
```
`make localinstall` installs the build tools on the first run (Node 22 or newer), packages the extension and installs it over the version you had. Run **Developer: Reload Window** in the windows that were open.
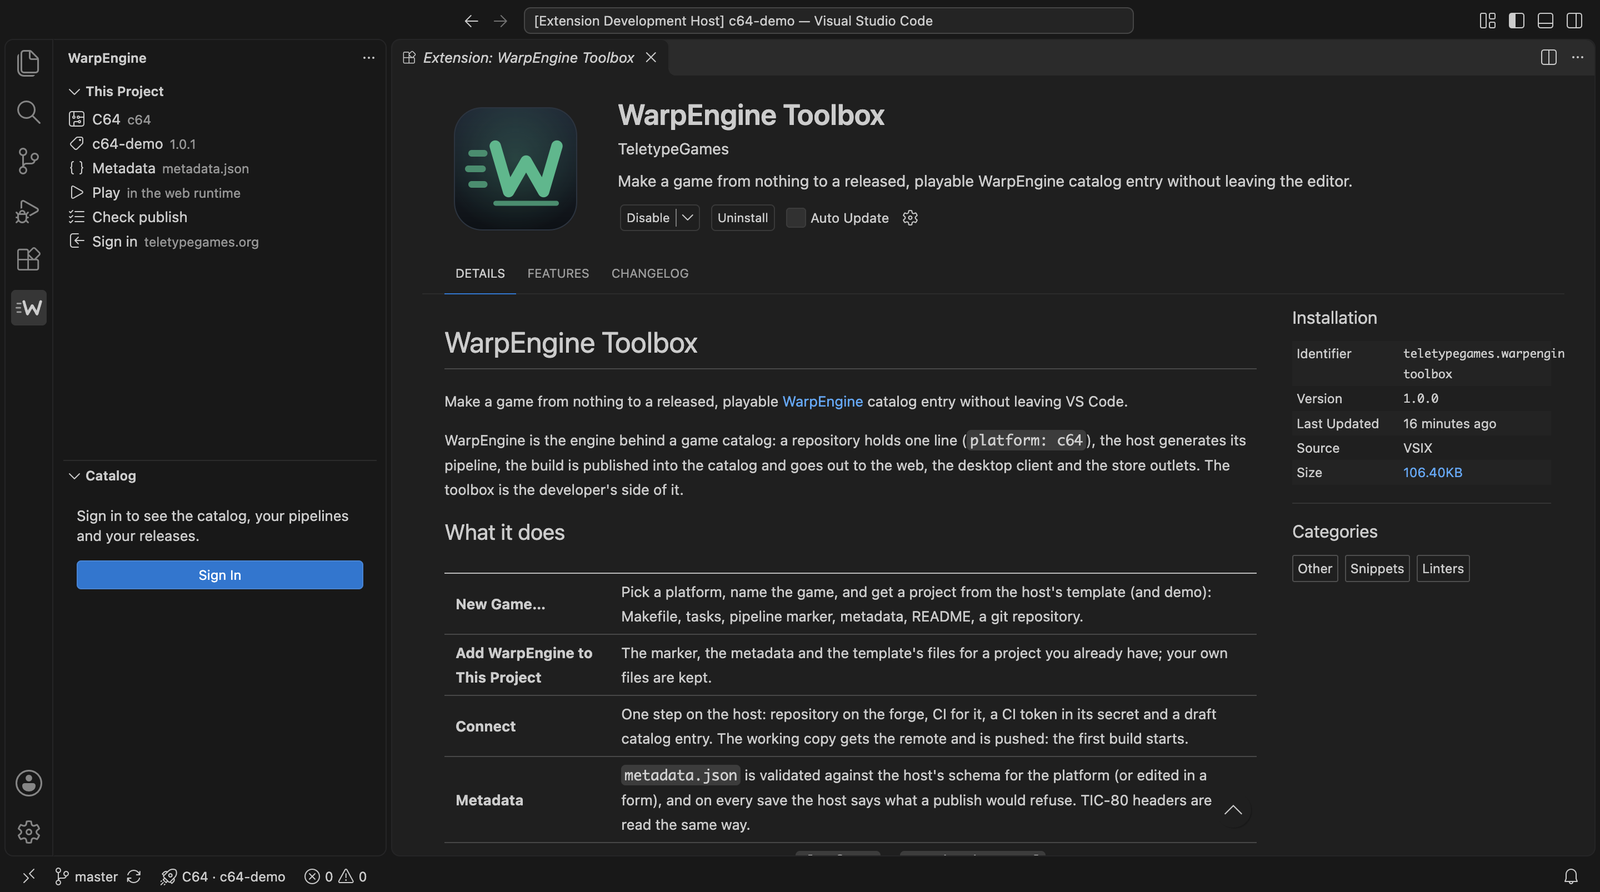
The **W** appears in the activity bar, and the toolbox is listed among the extensions:
## 3. Set the host and sign in
The toolbox ships no host: tell it which site runs your WarpEngine. Either run **WarpEngine: Set Host…** from the command palette, or put it in your settings:
```json
{
"warpengine.url": "https://teletypegames.org"
}
```
From here everything that only reads works: templates, metadata checks, builds, Play, the pipeline preview.
For the rest — Connect, the catalog, the pipeline status, releases — run **WarpEngine: Sign In**:
1. the editor shows a short code and opens the host's **Tool Sign In** page in the browser (`/admin/tool_sign_in`);
2. an **administrator** of the host signs in there, checks that the code matches, and clicks **Approve**;
3. the editor receives an Admin API token for the scopes it asked for (`admin:read`, `admin:write`), owned by the approving administrator. It lives in VS Code's secret storage; **WarpEngine: Sign Out** forgets it.
No password ever reaches the editor, and the sign-in needs nothing from the host but WarpEngine's own Admin API.
# From an empty folder to a release
```mermaid
flowchart TB
subgraph start[" "]
direction LR
A["New Game…
platform, name, title"] --> B["project from the
host's template"] --> C["Play
local build in the
web runtime"] --> D["Metadata
checked on save"]
end
subgraph ship[" "]
direction LR
E["Connect
repository, CI,
catalog entry"] --> F["push
pipeline in the
status bar"] --> G["Release…
version, changelog,
tag"] --> H["published:
web, client,
store outlets"]
end
start --> ship
```
1. **WarpEngine: New Game…** — pick the platform, name the game (lower-case letters, digits and dashes: it is the repository and the upload name too), give a title, a one-line description, the author, the licence and a category, and a folder. The project comes from the host's template — and, where the host has one, from a demo that already runs: Makefile, `.vscode/tasks.json`, the one-line pipeline marker (`.woodpecker.yaml`), `metadata.json` (on TIC-80 the Lua header), a README and a first git commit.
2. **Play** (▶ in the project panel) builds the game and plays it in a panel — in the very runtime its release will play in on the web (EmulatorJS, TIC-80 …), with your local build. Click once into the panel to start it: the browser lets the game's sound start only after a click, and the emulator waits for its sound. **Open in browser** gives the same page in a full browser tab.
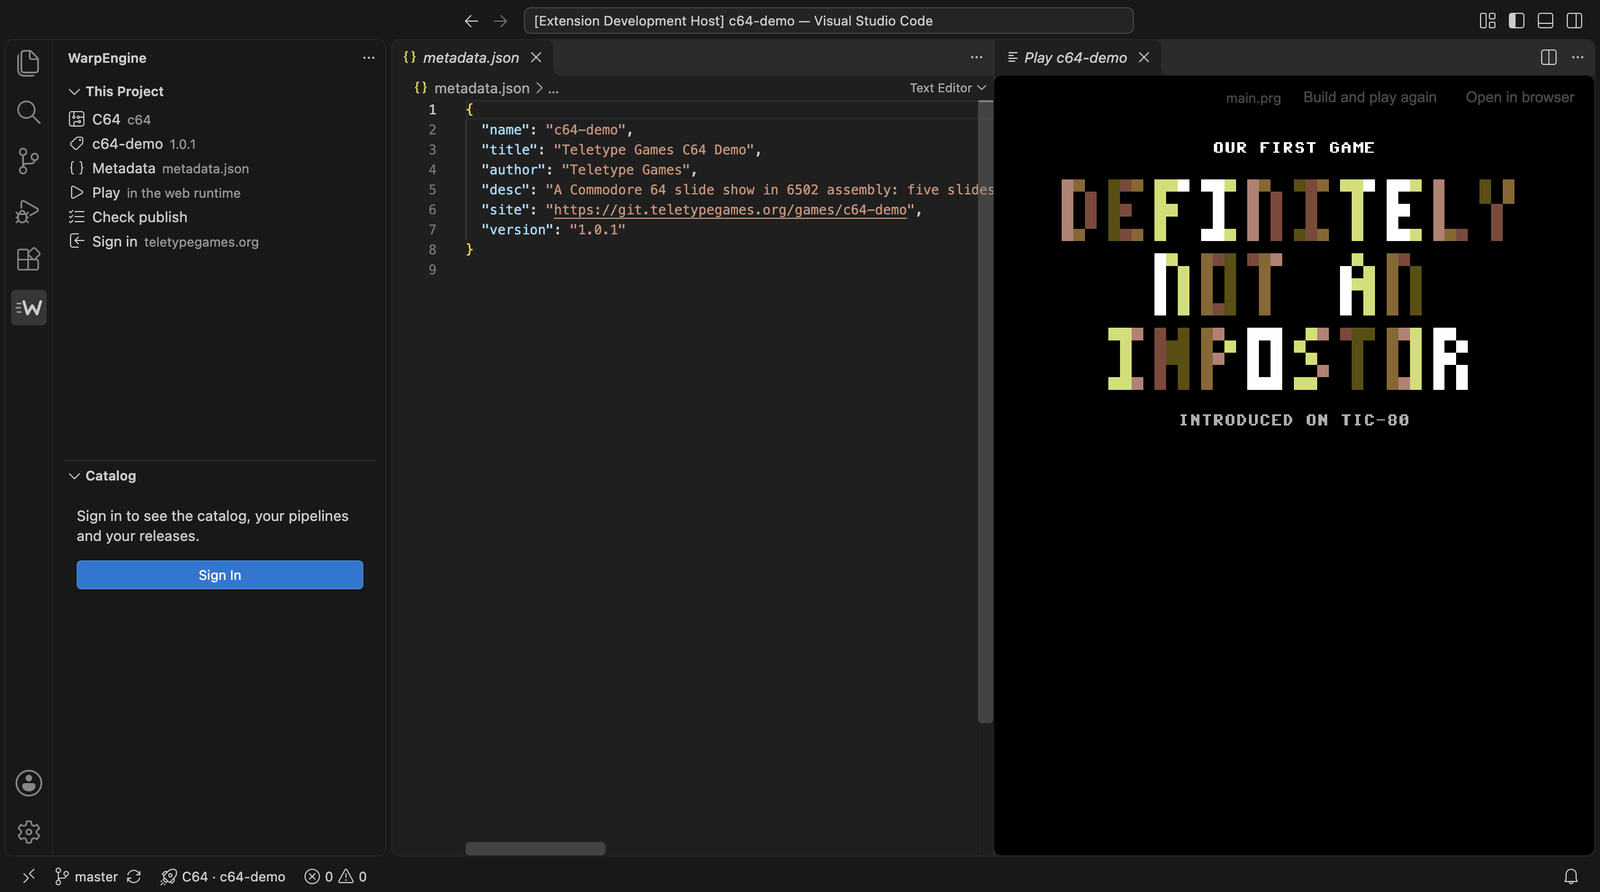
*Screenshot: the C64 demo built with `make build` on the developer's machine, playing in teletypegames.org's web runtime inside VS Code, after the first click.*
3. **Metadata.** `metadata.json` is validated against the host's schema for the platform as you type, and every save asks the host what a publish would refuse — a missing title, a shelf name another game holds, a version older than the published one. **Edit Metadata** opens a form over the file.
4. **WarpEngine: Connect** creates the repository on the host's forge, switches CI on for it, puts a CI token in its secrets and records a draft catalog entry — then points your working copy at the new repository and pushes. The first build starts.
5. **The status bar** follows the pipeline of your current commit after every push: spinning while it runs, a tick or a cross when it ends; a click opens the run.
6. **WarpEngine: Release…** asks for the channel — **stable** for everyone, or **beta**: a pre-release (`1.3.0-beta.1`) that is listed but offered only to those who ask for beta — then bumps the version where the platform reads it, writes `CHANGELOG.md` from the commits since the last release, tags `vX.Y.Z` and pushes. The pipeline builds and publishes it, and the release appears in the project panel with its asset checklist.
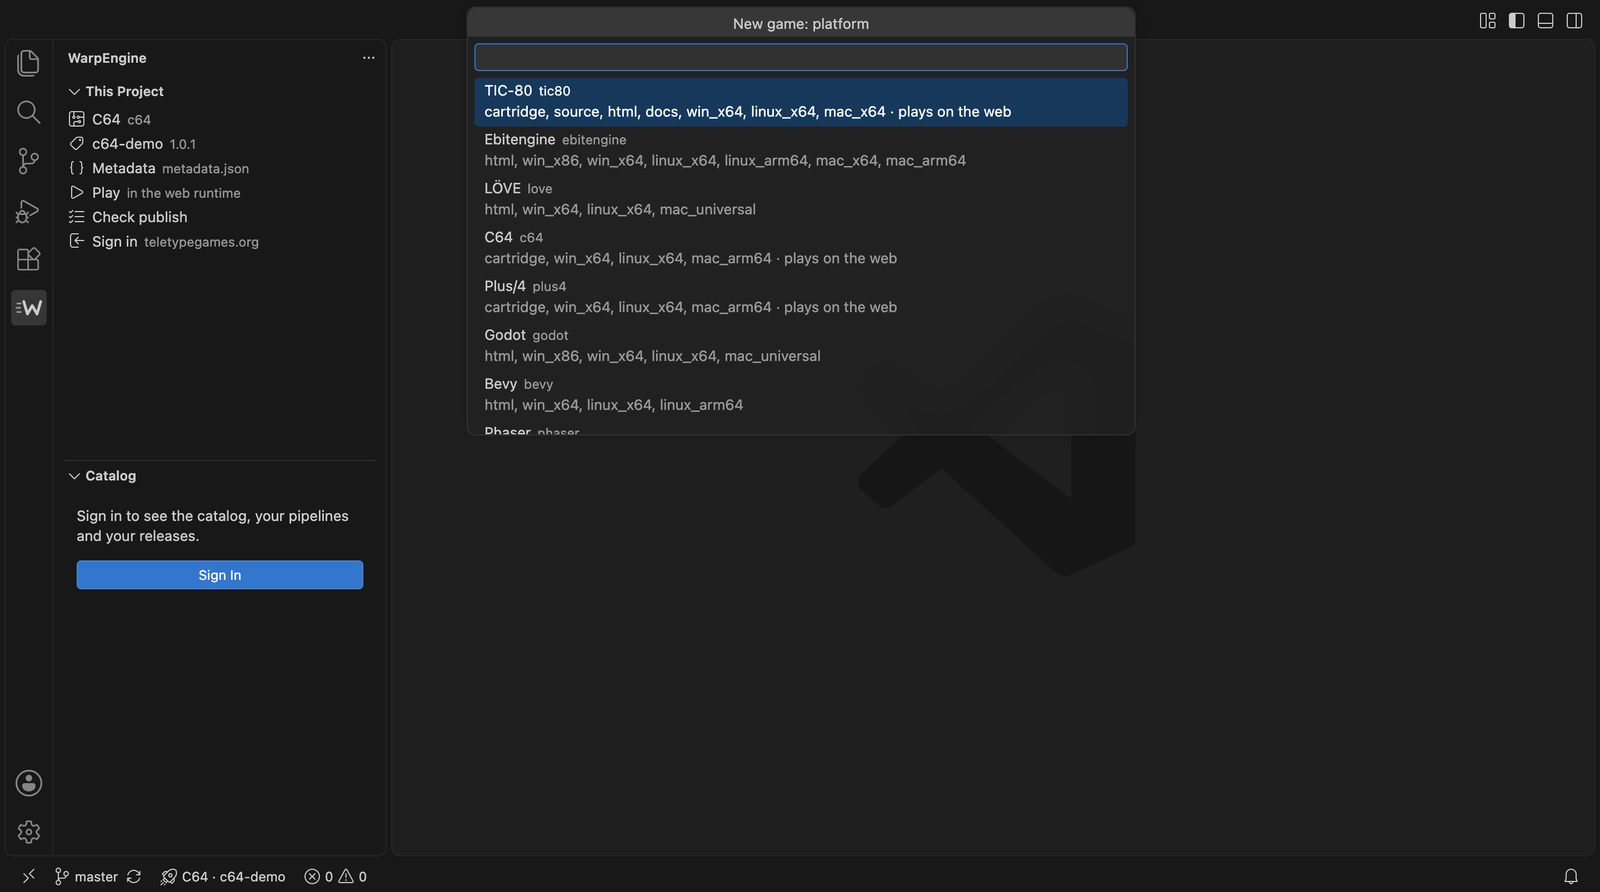
*Screenshot: the first step of New Game; the list is what teletypegames.org describes at `/build/platforms`.*
On any other branch than the default one, every push builds a **development build** of it: it is not listed in the catalog, but it plays and downloads by its own link. **This branch** in the project panel shows it with that link (**Copy Link** for testers), and a notification tells you when a push has built it.
To bring an existing game in instead, open it and run **WarpEngine: Add WarpEngine to This Project**: it adds the marker, the metadata and the template's files, and keeps every file you already have.
# What is in the panel
| Part | What it shows and does |
|---|---|
| **This Project** | platform, name and version, metadata, Play, Check publish, Connect or Release, the pipeline with its last runs, the releases with an asset checklist (`[x]` built, `[ ]` missing, `[-]` uploaded by hand) |
| **Catalog** | the host, who you are signed in as, every software grouped by platform — title, status, category and highlight can be changed in place — with releases, links and download statistics; the pipelines |
| **Status bar** | the pipeline of the current commit |
| **Tasks** | the Makefile's targets as `warpengine` tasks, with problem matchers for ACME, cc65, gcc-style compilers and Lua; **Build Like CI** runs the build in the platform's own builder image in Docker |
| **`.woodpecker.yaml`** | completion and hover for `platform:`, and a lens that opens the full pipeline the host generates for the marker |
| **AI** | the host's Admin API is registered as an MCP server, so Copilot or Claude in the editor see the catalog, the releases and the pipelines |
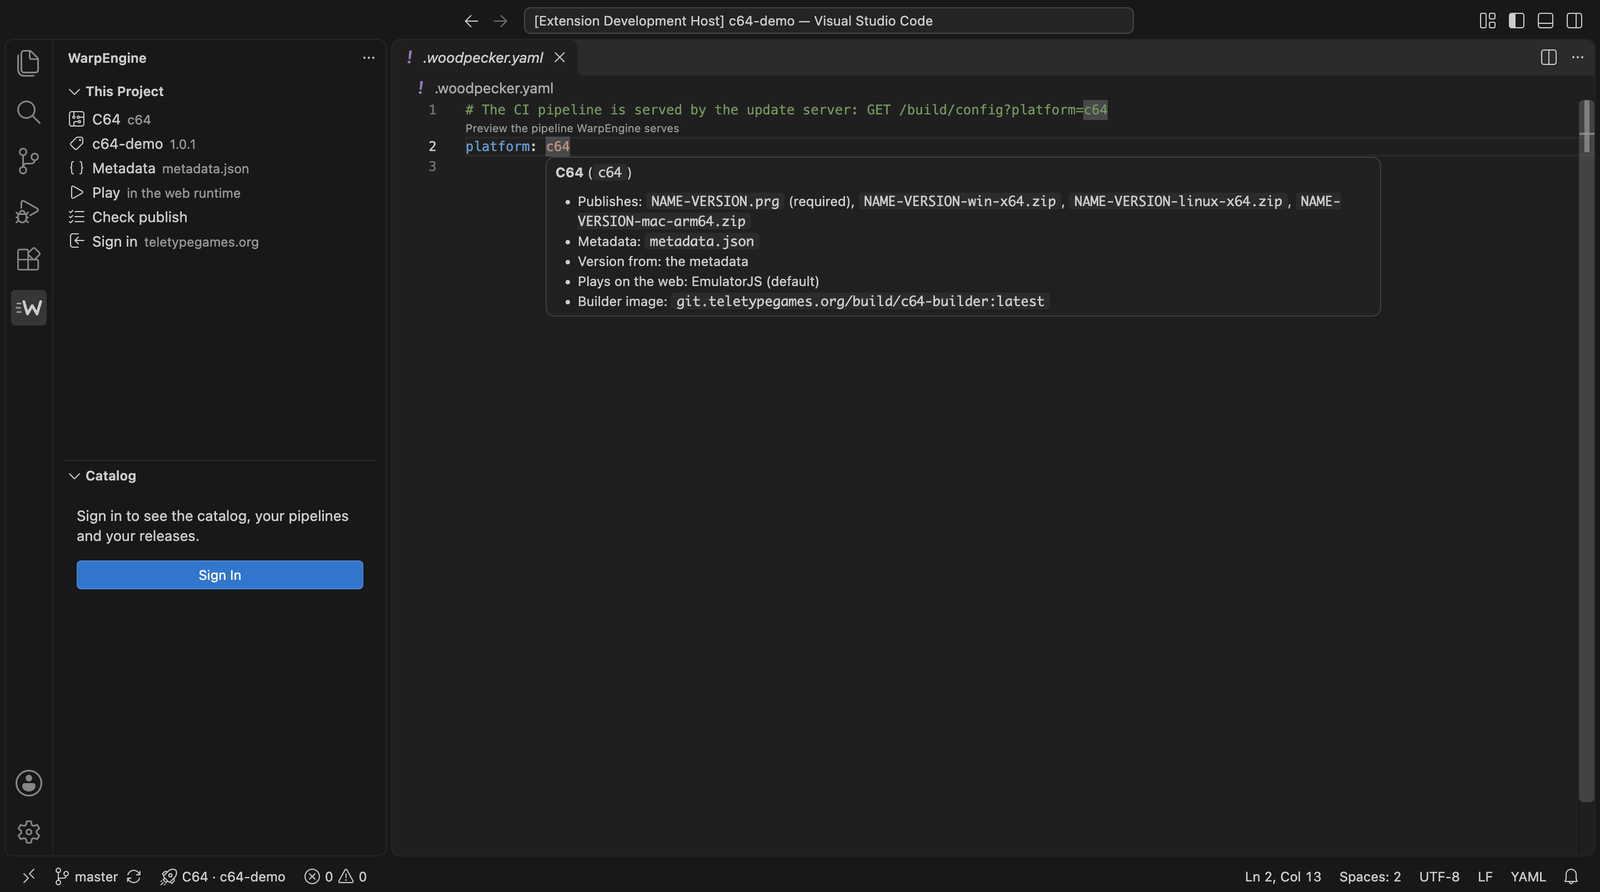
*Screenshot: hovering `platform: c64` in `.woodpecker.yaml` shows what the host knows of the platform.*
# Commands
| Command | What it does |
|---|---|
| **WarpEngine: New Game…** | a new project from the host's template (and demo) |
| **WarpEngine: Add WarpEngine to This Project** | marker, metadata and template files for an existing project |
| **WarpEngine: Connect** | repository, CI, CI token and catalog entry in one step, then push |
| **WarpEngine: Play in the Web Runtime** | build and play the local build |
| **WarpEngine: Check Publish** | what a publish would refuse, as problems in the editor |
| **WarpEngine: Build Like CI (Docker)** | the build in the pipeline's builder image |
| **WarpEngine: Preview Pipeline** | the pipeline the host serves for this repository |
| **WarpEngine: Release…** | version, changelog, tag, push |
| **WarpEngine: Edit Metadata** | the form over `metadata.json` |
| **WarpEngine: Set Host…** | choose or add the WarpEngine host |
| **WarpEngine: Sign In** / **Sign Out** | the tool sign-in |
# Settings
| Setting | Default | Meaning |
|---|---|---|
| `warpengine.url` | empty | the address of the WarpEngine host in use |
| `warpengine.hosts` | empty | more hosts **Set Host…** offers to switch between (`name`, `url`) |
| `warpengine.checkOnSave` | `true` | ask the host on every save of the metadata |
| `warpengine.docker` | `docker` | the command **Build Like CI** runs |
| `warpengine.defaultLocation` | your home folder | where **New Game…** offers to put new projects |
# What the host needs
- **WarpEngine 4.0 or later**, with the Admin API switched on — the toolbox reads `GET /build/platforms`, the metadata schema, `POST /build/check`, the tool sign-in and the Admin API.
- **Templates:** the host names a template (and a demo) per platform with `platform_tooling`; without one, New Game writes only the marker, the metadata and a README.
- **Connect** needs a forge configured on the host (`forge :gitea …`) with a token that may create repositories; without it, Connect answers that there is no forge.
- **Play** loads the host's `/play-preview/` page and its runtime files (`/file/_runtimes/…`) through the toolbox's own local server, and hands the build over in the page; nothing is fetched from the developer's machine by the host's page.
On **teletypegames.org** the templates are the `build/*-tools` repositories, with a demo for Ebitengine, LÖVE, Plus/4, Godot (Pong), Bevy and Phaser.
# When something is off
| Symptom | Cause |
|---|---|
| The Catalog panel asks for a host | `warpengine.url` is not set: **Set Host…** |
| Play stays black | click once into the panel; if it still stays black, the host is older than WarpEngine 3.8.2 |
| Connect says there is no forge | the host has no forge configured, or its token is missing |
| No pipeline in the status bar | not signed in, or the project is not connected yet |
| The sign-in page asks for a login | it is the host's admin: sign in there as an administrator first |
# Source
The extension lives at [tools/warp-engine-toolbox](https://git.teletypegames.org/tools/warp-engine-toolbox). `make check` runs the type check, the linter and the unit tests; `npm run test:integration` starts a real VS Code with a sample C64 project and runs the extension against a host (`WARPENGINE_TEST_URL`, teletypegames.org by default).
[howto](https://wiki.teletypegames.org/tags?tag=howto)[engine](https://wiki.teletypegames.org/tags?tag=engine)[warp-engine](https://wiki.teletypegames.org/tags?tag=warp-engine)[tooling](https://wiki.teletypegames.org/tags?tag=tooling)[typescript](https://wiki.teletypegames.org/tags?tag=typescript)[vscode](https://wiki.teletypegames.org/tags?tag=vscode)
## Related pages
- [WarpEngine Admin API](https://wiki.teletypegames.org/engines/warp-engine/admin-api) WarpEngineSince WarpEngine 1.0: what the admin does, as a JSON API under /api/admin/v1, with a live OpenAPI 3.1 document and an MCP server.
- [WECP](https://wiki.teletypegames.org/engines/warp-engine/wecp) WarpEngineWarpEngine Catalog Protocol: the endpoints a WarpEngine server offers to catalog readers, each with its response shape.
- [WarpEngine Client](https://wiki.teletypegames.org/stores/warp-engine-client) StoresThe WarpEngine Client app: the catalog as a grid of cards, the store engine built in, and a settings dialog for the stores on the machine.
- [warpstore](https://wiki.teletypegames.org/engines/warpstore) EnginesThe shared core of our store engines: one file that knows the WarpEngine catalog, so an engine only has to know its host platform.
- [WarpEngine RetroArch Store](https://wiki.teletypegames.org/stores/warp-engine-retroarch-store) StoresThe RetroArch store engine: any WarpEngine catalog becomes .lpl playlists with box art, on desktop, Android, the Steam Deck or a handheld.
'; var prevLevel = 2; for (var i = 0; i < headings.length; i++) { var h = headings\[i\]; var text = h.textContent.trim(); var slug = text.toLowerCase() .replace(/\[áàâä\]/g,'a').replace(/\[éèêë\]/g,'e').replace(/\[íìîï\]/g,'i') .replace(/\[óòôöő\]/g,'o').replace(/\[úùûüű\]/g,'u') .replace(/\[^a-z0-9\]+/g, '-').replace(/^-|-$/g, ''); if (!slug) slug = 'heading-' + i; if (used\[slug\]) { slug += '-' + i; } used\[slug\] = true; h.id = slug; var level = parseInt(h.tagName.charAt(1)); var cls = level > 2 ? ' class="toc-child"' : ''; html += '- [' + text + '](#'%20+%20slug%20+%20')
'; } html += '
'; toc.innerHTML = html; // Scroll-spy: highlight current heading var links = toc.querySelectorAll('a'); var ids = \[\]; for (var j = 0; j < links.length; j++) ids.push(links\[j\].getAttribute('href').slice(1)); function updateActive() { var current = ''; for (var k = 0; k < ids.length; k++) { var el = document.getElementById(ids\[k\]); if (el && el.getBoundingClientRect().top <= 80) current = ids\[k\]; } for (var m = 0; m < links.length; m++) { links\[m\].parentNode.classList.toggle('active', links\[m\].getAttribute('href') === '#' + current); } } window.addEventListener('scroll', updateActive, { passive: true }); updateActive(); })();
---
## Navigation
- Parent: [Development](https://wiki.teletypegames.org/development.md)
- Previous: [Useful materials](https://wiki.teletypegames.org/development/useful-materials.md)